Wednesday, October 28, 2009

Our November Guest Designing Diva!!!

Welcome Sandee Shanabrough :) I am so excited to announce our November Guest Designer Diva. Sandee has been a faithful Midnight Madness Sketch Challenge player for quite some time now. Many of you already know her and if not, it is with great pleasure that I get to introduce you to her. Her work is just amazing and she is extremely talented. I know her work will bring so much inspiration to the Midnight Madness Sketch Challenges this next month. Here is a little bit about her.....

"I am so excited to have been asked to be a part of this team for the month of November! I have been playing in the weekly sketch challenges for quite a while now and have enjoyed each and every sketch. Thank you Priscilla and the whole MMSC team for having me this month and for all of your hard work getting this organized and making this so much fun each week! I have been crafting most of my life. My mother is very artistic and I credit her for giving me the crafting gene! I was introduced to stamping in the late 90’s by a sweet friend (Hi Beth!) and was instantly hooked. I love all of the wonderful tools, embellishments and, of course stamps, that are available now! My dear hubby of 30 years is so wonderful and encouraging of my addiction, ahem, I mean hobby! We have two grown children and three precious grandchildren. My oldest granddaughter loves stamping with her Grammie, and we stamp together every time she visits! Pretty soon, I’ll have the other two stamping with me too! I have lived in Georgia my whole life and have been working with the same company for 29 years. Hubby and I hope and pray we’ll be able to retire within the next few years. I need more time to stamp!! With the holidays coming up, this will be a fun month to be a part of this team! I am looking forward to it!"

Sandee will be helping us choose our December Guest Designing Diva. We have some really fun things planned for Dec, including a "Holiday Blog Hop" We know that this time of year can get a little crazy, BUT if you have the extra time and would like to be our NEXT Diva, just let us know by leaving us a comment. Stop by Sandee's Blog and give her a shout out!!

“CONGRATULATIONS”

Sandee, we are just thrilled to have you with us, and below is your Guest Diva Logo. Please display it proudly :)

I would like to take this opportunity to make a couple announcements. Shawne from out DT will be taking out time to focus on her beautiful family and of course on her expanding stamp line. So we now have Jessica, Sonya, Kimmie and Shawn on our prestigious Alumni list. We are so proud of these wonderfully talented ladies and we are so happy for our design team members that are making leaps and bounds in the craft world. Many are enthralled with their own stamp lines and we could not be more happy for them. We are proud to call them part of the Midnight Madness Alumni. They will always be our friends and are sad to loose them to our Alumni group. We have a special Midnight Madness Alumni Logo just for you ladies. We would be honored if you displayed it proudly. Thank you for being a part of our group these last few months.

As sad as we are to see our friends names move to the Alumni column, we are just as proud to announce our newest long term team members. Please help me in Congratulating.......

Carol Hurlock and Linda Lucas!!

On behalf of the whole Midnight Madness Design Team, we are so excited to maintain this wonderful flow we have going at the moment. You both add so much to the team and this collaboration is bound to generate tons of inspiration and a bunch of new, fresh ideas for our team and for all who follow the MM blog. Thank you for joining us.

We would like to thank EVERYONE who entered our diva challenge. We have so many super talented people playing our challenges!! You have no idea how hard it is to vote each month. We will be looking for a guest designer each month, so please keep playing because we love the inspiration everyone brings to us. If it was not for our players, there really would not be a Midnight Madness Sketch Challenges. So Thank you :) For a more details on what we are looking for click HERE and scroll down.

You could be the NEXT Guest Diva :)>

Mid Week Midnight Madness "Linda's Chalking" Tutorial

Below is this weeks fabulous Tutorial from our very own Guest Design Diva Linda.

"How to Chalk an Image"

Chalking is such an unrated technique, one that I just love for a number of reasons...the first being that it is so easy and they are so 'kind' to work with - while you are using them dry you can rub out any mistakes (phew!) I have been asked so many times to show how I do chalking, that when Priscilla from Midnight Madness Sketch Challenge asked me to consider doing my first Tutorial as the October Guest Diva, I knew it would have to be on chalking! Please bear in mind this is my VERY FIRST Tutorial....


These are the basics to get your chalking happening:
~White card stock for stamping your image. I have found that some card is better than others for chalking, if they have a 'coating' of any sort, then the chalks don't adhere too well and it is TWICE as much work!
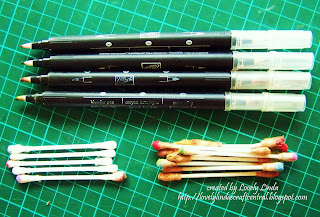
~ Blender Pens, I use the Stampin' Up ones and really love them! Don't throw away your older ones, they are still great to use and I will show you why as we go along.
~ Cotton buds, or as many of you say 'Q-tips' These are the best thing. many people use eye shadow applicators, but I have found that cotton buds are perfect - I love them for this!
~ A Water Colour Pen or Pen, for adding fine detail. I also use White Gel Pen a lot for highlights as well as Glitter pens.
~ Dimensional Magic - this is the same thing as Crystal effects. This is to add gloss to any features - depending on the card


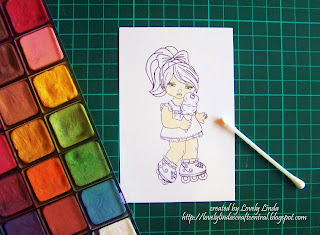
If you are cutting out your image, which I often do, don't do it until after you have finished, it is easier to work that way! Okay...we are ready to start. I start with a Cotton Bud and colour all the flesh areas. I basically use the same technique as Water Colouring, you start with the lightest colour and applying about 3 applications, each one going a shade darker IF YOU CHOOSE! remember you are not for definition with this layer - we are just setting a base to build on as you can see here!


I like to have shading with the clothing and start from the outside in, leaving a strip of white in the middle, again you build these layers as you go and can make the gap smaller of you need to, blending as we go....remember nothing is permanent at this stage!! Something like this is what we are aiming for:


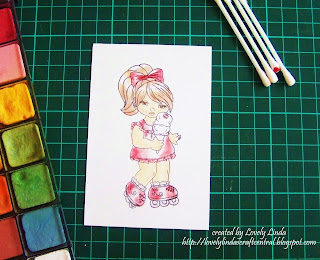
Okay, now we are starting with the second layer of colour...this is still done with the Cotton Bud and you can use a darker shade if you wish. I usually use the same shade for clothes and go one darker for the face, arms and legs, but only slightly darker otherwise you get a bright 'sunburn't look - not to pretty on an image like this GURLEE GIRL! Just take your time, once you get going you will be surprised how fast chalking is....

I do each layer of colour fully before going onto the next...you should be building depth as you go. At this stage you can rub out anything you aren't happy with, have perhaps gone over the edge or want to add some shading!!

Note - I do NOT add the colouring on the cheeks until last!


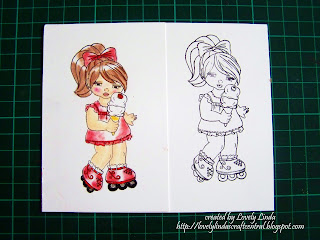
You can see now the image is starting to 'take shape' and you are getting the definition - this is where it gets exciting...the BLENDER PEN!! I use this to add the final definition, really defining light and shade and adding those extra touches that you would like to have stand out. This is totally a personal thing, the same as water colouring - this is where it reflects your style. I have looked at many styles with colouring and taken what I like from each, put it together and come up with my own 'flavour.'

Once I have done this I use a pen, in this case a red one, to do any finer lines and detail eg. the swirls and detail on the shoes, the cherry on the ice cream, anything you think needs it!


Finally, I add those extra touches, such as her 'make up' starting lightly and only using a Cotton Bud - careful here as the colour builds pretty quickly at this stage and it is easy to add too much - you don't want to be doing too much rubbing out at this stage! Once you have used the blender pen the colours are more permanent and definitely bolder. I add a white spot to her cheek with a White Gel Pen - it makes highlights her face.


A TIP FOR YOU!! I have used new cotton buds and the newer Blender Pens for this Tutorial, but don't throw out your cotton buds and Blender Pens to soon - I love using the 'seasoned ones' and have included this photo to show you what I mean - you may want to 'brace yourself' they are not pretty but they work beautifully!!


Thank you for taking the time to have a look at this Tutorial. I hope it has been of some help to you - don't be afarid to give it a try - it is easier than you think! Please pop back and show us what you have done - I would love to see some chalking on your Midnight Madness Sketch Challenge!! God bless you!

Linda, you ROCKED your very first tutorial!! I know a lot of people have been waiting for it. Yeah we got to see you in action with your chalking technique. Thank you for sharing it with us!! :)

Monday, October 26, 2009

Midnight Madness Week #25 (MMSC25)

(10-30-09 sorry it is late this week)
Our Bonus Winner for MMSC24 is....
CONGRATULATIONS !!
Plesae contact me via email so I can forward your info to our sponsor.Thank you to everyone who played!
~~~~~~~~~~
Hello and so glad you could join us for another weekly Midnight Madness Sketch Challenge. I would like to take this opportunity to thank those of you who play our sketch challenges and have been confronted with just that, “A Challenge” I commend all of you who have stepped out of your comfort zone and pushed through what sometimes seem to be a stretch for your imagination. The results you are coming up with are just incredible. We appreciate the feedback in regards to our sketches and strive each week to make them interesting and of course a “challenge” for you. The coming weeks will be no exception ;) Our DT has already scheduled our next Blog Hop which will be coming to you all on Dec 8th. Our Holiday Blog Hop will be a week long Hop filled with surprises and of course prizes. If you would like to help spread the word about our next hop by posting this logo on your side bar we would appreciate it. As you know, here at the Midnight Madness Blog, anything can happen. We have a “Midnight Madness Prize Patrol” that will be on the look out for our “Special Midnight Madness Holiday Blog Hop Logo” If one of our team members spots this special logo, your name will go into a special drawing. (playing our challenges is NOT required for these prizes) We will be looking for our MM Holiday Logo from NOW until the Holiday Blog Hop starts.

We will be awarding an appreciation gift every week to one lucky person until our Holiday Blog Hop is launched, so the search starts NOW!!…good luck!!!

This is the last week to get in on the drawings for the Oct Months Giveaways . Month end drawings will happen next week. Today is the last day to enter MMSC24 for a chance at last weeks bonus prize. You have till Midnight EST 10-27-09 to get your MMSC24 entries in to qualify. One winner will be drawn for our Bonus giveaway on Wednesday, so be sure to check back for that. If you miss the deadline, you are still welcome to link up to Mr Linky, but any entries after the "LAST CALL" will not be in the drawing.

MIDNIGHT MADNESS MASTERPIECE AWARD
Each week we are awarding a special Badge Award to one person for their outstanding sketch submission. If you would like to be considered for this award, please make sure your card link is posted to Mr. Linky by Sunday of each week. This is our way of let you know how wonderfully talented you are and how much we appreciate you sharing your craft with us. This week we are proud to say the“MIDNIGHT MADNESS MASTERPIECE” Gold Star Award goes to.....

#33. Cabio
Enjoy your award and please display it proudly!
(if you would like the blinkie code, just email me ;)
Sketch Challenge Star Award MMM


The "NEW" MM REMARKABLES AWARD!!
The Midnight Madness Team has created a very special award called The “Midnight Madness Remarkables” Award !! We would like to acknowledge those entries that are just exceptionally Remarkable!! During our voting each week, due to the caliber of the cards entered in our challenges, we end up with so many ties and close votes, so this Fairy logo is for those recipients to display proudly. If you would each like to take our fairy logo for your side bar, she would love to come stay with you.

Thank you all for playing and please help me in congratulating our “Midnight Madness Remarkables” award winners…..
~~~~~~~~~~~~~~~~~~~~~~~~~~~~~~~~~~~~~~~
You have one more week to get in on our Month End drawings. Our sponsor for the month of
October was....

Winner will get 3 free stamps of their choice AND a $50 Certificate that is valid till June 2010. WOWZER :) Thank you again Chelsea
Month End Drawing #1


Our Month end Blog Candy was from Sue - McMahon Five Designs
For every entry to the Midnight Madness Sketch Challenges this month, you will go in the drawing for the GRAND PRIZE Month end awards. As an added BONUS…if you "FOLLOW" Sue's blog and leave her a comment, you will get an EXTRA entry in the month end drawing, so hop on over to Sues’s blog before it is to late!! Just post a comment stating it is for the Oct MM Blog Challenge Candy, the MMSC you played and be sure to click her follow button. Thank you Sue for this SUPER yummy Candy donation. Check out her FANTASTIC “Challenge Blog Candy” below!!
Month End Drawing #2


Month end winners will be announced the first week of Nov.
~~~~~~~~~~~~~~~~~~~~~~~~~~~~~~~~

OUR MMSC25 WEEKLY BONUS SPONSOR IS.....


Shawne, from our very own DT, has her own stamp line and has very generously offered up a $25 Gift Voucher to the store that features her line. Here is a little bit about Shawne in her own words…..
" I wish there were something exceptional for me to say but I'm afraid I'm really extraordinarily ordinary. I wish I could claim to have a degree in the arts or graphic design but I don't. I've just always loved to draw and paint. I think I'm like most of you out there. A crafter at heart. I used to call myself a SAHM but the term seemed like an unfair assessment of my life, since most of us work around the clock and so I began calling myself a WAHM. So I am a wife and WAHM of four beautiful daughters, I love my life but wanted something of my own. Cardmaking became a creative outlet for me and a way to get back in touch with myself. A few years later fate led me to Clear Dollar Stamps and I became an Illustrator for them. It was a dream come true. The kind of job I pretended to have as a child! I'm inspired by my surrounding and things that I love which I guess is pretty typical of an artist. I happen to be surrounded by little girl's so most of my work is child like and girly. Growing up some of my favorite times were spent at the beach or on my family's farm. I get a lot of inspiration for my drawings from there too! "

Today, many of our MMSC25 sample cards were made with *Shawne’s images. Be sure to click on each one to find out all the details. You can check out Shawne's complete line HERE. Our MMSC25 Weekly Bonus Winner will win $25 Gift Voucher redeemable at Clear Dollar Stamps donated by Shawne...Thank you Shawne.


~~~~~~~~~~~~~~~~~~~~~~~~~ .
NOW FOR OUR WEEK #25
SKETCH CHALLENGE


Here is Week #25 (MMSC25)


(sketch designed by Shawne)


* Carol-Chocolate, Crafts, & Bears!


* Priscilla - "priscillastyles"


Lovely Linda's - Craft Central!!


* Jeni - Jeni's Custom Cards


* Sue - McMahon Five Designs


Carolyn - Creative Card Corner


* Chris - Twinkles Glow with Stamps


* Phyllis - SparklePlenty1000


* Charlotte - Designs From Within


* Jane - The Paper Affair


* Michelle - Daydreams by Michelle


*Denise - kc242 Designs by Denise


REMINDERS!!!....
1. You need to be a “FOLLOWER”
2.
The “Midnight Madness LOGO BADGE/LINK” should be displayed on your blog.
3. Your card post needs to have a Hyperlink back to this blog.
4. Tag with MMSC25 when uploading to galleries.
5. Only ONE entry per person per week please (If you choose to enter more than one, ONLY your FIRST entry will be judged and entered in the drawings)
6. Enter your project to Mr. Linky below
7. Leave a Comment below.
8.
***Read the General Rules**

MMSC25 ENTRY DEADLINE Nov 3rd MIDNIGHT EST
When you add your name to Mr. Linky, some how add an initial or make your name distinguished..(ie Lisa A. or Lisa B.) this will be very helpful with the more frequently used names so we can differentiate the players for our Mad Money Drawings.>


Midnight Madness by Priscilla MMSC25


Here is my MMSC25 Card


Envelope made with the "Thinking Inside the Box" kit


Thank you for dropping in today. This card was made for the Midnight Madness sketch challenge #25 (MMSC25) I used our very own DT members stamp. Shawne has her own line that you can find by clicking on the "Studio 313" logo on my side bar. I hope you like what I made today and remember to enlarge any of the pictures so you can see all the details, just click on them. I would love to hear your plans for this Halloween. I hope you have a Happy Halloween and please be safe :)


Wednesday, October 21, 2009

Mid Week Midnight Madness "Carol's Mug of Cocoa" Tutorial


Below is this weeks fabulous Tutorial from our very own Design Team Member Carol.

"How to Make a Mug of Cocoa"
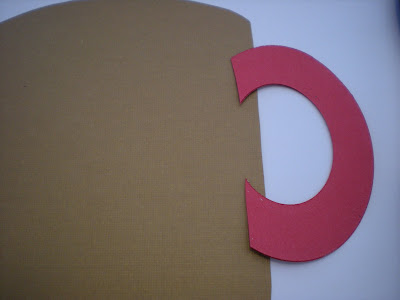
Today, I am going to show you how to make a mug to hold cocoa. This is something that really happened by accident. I guess you could say, I really got into this card and just kept adding things as I went along. Who could resist this sweet Cocoa Girl that Chelsea created. The more I look at her the more I can think of things to make with her. Just think how wonderful this would be as a get well card. Instead of including a Cocoa packet, you could include a Cup-of-Soup packet. The same thing goes for tea or coffee. You are only limited by your imagination!!!So here you have my card that I originally started with a pocket for the recipes for Cocoa. My card is 6" x 6" and the pocket is 6" x 3-1/4". This will hold your mug nicely. Make sure to either stitch your pocket or use a strong adhesive so it will not pull apart when you place the mug inside. It is optional to put the recipes inside, but like I said...this all happened accidentally and I am keeping the recipes in here. lol You are going to get the template for your mug here at Mirkwood Designs. It is actually a template for a card, but I modified it. You want to make sure your printed template is 10 inches tall. So you will need to print on 8-1/2 x 11 paper. I glued this template to an old cereal box, cut the cup in half on the dotted line and cut the handle off. This is what you are going to use to trace on your card stock. After cutting, you could emboss these pieces.Once you have your card stock cut out, then you are going to cut out the handle. I wanted a bulkier handle than the one on the template. So I used two dies from my oval nesties the 3-1/4" and the 2". Place those nesties as you see here in the picture. I cut both handles out at the same time. I used two pieces of card stock. It is optional if you want to emboss the handles after cutting. I did on my sample one, but not on my finished one. It's up to you.Next we will assemble the handle. I found that you need to cut to size for placing inside the mug portion of this holder, otherwise your cocoa packet will not slip in and out of this nicely. Measure down 1/2 inch from the top and place a mark where you are going to place the top of the handle and 3-3/4 down like you see in this picture.

Now you are going to want to cut away a portion of this handle. I just guessed at about how big I wanted my handle. You then want to place a small amount of adhesive to keep it in place. Put the top piece on and either sew or use a nice strong adhesive so that it won't come apart when you put your goodies inside.
So here is what it looks like after you put it together. I used a 3-1/4 x 3-1/4 piece of decorative paper to match my card in the front. Just as an idea, I thought this would be really cute with a picture of a child framed on the front of this as well.We are going to assemble the flower next. As you can see, I used every little bit of this wonderful wood paper. I only have shreds left. I just love this stuff. I have a variety here of punches for making the flower. The base of the flower is made by punching 2 of the largest punch from the cork. The middle is 2 punches from the medium punch of the sitka wood, and the small punch is only one punch from cork. I have shown a brad here that I use to keep the flower all together.You are going to punch a little hole in the middle of all the flowers for ease in assembling on the brad. The tool I am using comes from the Cricut tool kit. I can't tell you how much I use this...it is so versatile I would buy that tool kit again just for that!Put the smallest flower on the brad first, then the two medium and then the large. Twist so all petals show. This is how your flower should look. I put some stickles just on the sitka wood paper because I want to keep the natural look of the cork.You can decorate your mug as you like. As you can see here, I put some feathers with my flower and attached my matching image and a bow on the handle. I would have put a charm on my bow if I could have found a mug or a spoon one...and that would have been really cute.This is a picture of what the mug looks like inside the card. You can see it fits perfectly!Here is a picture of the whole project. The card, the envelope, the recipes, and the mug.Thank you for stopping by to view my tutorial for this project. I really appreciate it and would love to hear what you think about it. You reach me at Chocolate Crafts and Bears, Oh My. If you have any questions, I would be happy to answer them. If you should make this project, I would love to come and see it.
Thank you Carol, you did an Awesome Job with this tutorial. If you decide to give any part of this tutorial a try, please come back and share your project with us. We would love to come take a look. As always, we would love to hear your thoughts and comments :)
THANK YOU FOR STOPPING BY :)
Priscilla