Wednesday, September 30, 2009

Mid Week Midnight Madness "Carolyn's Shaker Card Tutorial"


Below is this weeks fabulous Tutorial from our very own Design Team Member Carolyn.

"How to Make a Shaker Card"
There are so many ways out there anymore to make a shaker card, but I would like to show you today how I make a traditional shaker card. It really isn't very hard once you get the hang of it, and they really are so much more fun than a typical card that you can't "play' with. They are so much fun for the holidays and especially if you have children on the card giving list. However, I am thinking that I have heard of so many adults really enjoying playing with these too. So, let's get started...
These are the basics to get your shaker card going.
You can choose whatever shaker material that suits your card best.
~Nice heavy cardstock, because shaker cards can tend to get a bit heavy and really need a nice supportive base to keep it sturdy.
~Any other papers that you will be using to design your card with.
~Dimensional tape I like to use the Bumblebee scissors when cutting the dimensional tape, because they don't stick to the tape like some scissors do.
~Ruler
~3 in 1 craft glue
~Acetate for the clear shaker window
~Nestability or anything that you use to cut your frame with.
~Whatever shaker material that you choose. I chose to use both, stars and snow for mine, but there are many things that you can fill a shaker with.

You'll want to have your image cut out so that you know how big it is going to be and how big of a card that you are going to need to work with in order for the shaker to fit and still give you room to decorate it. Prepare your image by coloring it, layering or glittering, and let it dry before going any farther. While you are waiting for your image to dry, you could always start working on your card base and getting it ready, since you should know the size of card that you will need at this point. Once you are done with your card base, decide where you want your image to be on your card and then measure a piece of desired cardstock to match the size of the paper that your image is on. Take your nestability or whatever you choose to cut with (it can be any size or shape that you choose), then center it on your cardstock and cut out the center of the cardstock. This is going to be your shaker window. Be sure to leave enough room on ALL sides to be able to fit the double sided dimensional tape. You don't want that to be sticking out anywhere.
Decorate that Shaker window cardstock any way that you like. You can run it through the cuttlebug and emboss or whatever you would like. I like to get this piece all decorated before I put the card together, but you don't have to do it that way. You can piece your card together first and then decorate it. I kind of like to see what things are going to look like before I put it all together in case I don't like it, then I can change it. The next step is something that you must take your time and be patient and precise. I like to put a fairly thin line of glue down each side of the backside of the cardstock shaker window. Do ensure that the glue line is even and covering each of the sides. Do not overdo the glue though, because it will run when you try to secure it and it can seep into the window area. This will really upset you as you will have to cut a new piece of acetate and try again. Carefully place your acetate down on the glue side of the cardstock and again wait patiently for this to dry, because it can slide and ruin all the work you have already done if it is not completely dry. This is where you should be right now....Your window piece should be ready to go.
Ok, get your dimensional tape out and your shaker material ready
This step is also VERY, VERY important!! You must line your shaker window with dimensional tape and you ABSOLUTELY MUST line your tape up evenly to have the tape meet perfectly at each corner. Do not allow any gaps in the tape, or else your shaker material will leak out. Unless you have a really thick dimensional tape, you will find that you are probably going to have to double layer the tape to give enough room for the shaker material to move around.
Add your shaker material, but be careful not to overdo this either, because even though you may think you need more, you really need very little to fill these windows up without having it overtake your image. Some shaker materials can seem to be static-y (don't know if that is a word), so you might want to check this out before using it. I had heard somewhere that if you rub a dryer sheet over your clear window that it won't stick, but I can't see that not smudging or scratching the window, so I have not tried this myself. Remove the backing on the 3d tape and get ready to place your image over the window. It's hard to know how you are placing an image when you are doing it upside down, but try to place your image as evenly as you can to line up with the tape on the shaker window. When you get your image placed where you like it, be sure to press down around the frame to secure the tape to the image with no gaps or openings for your shaker material to leak out of.
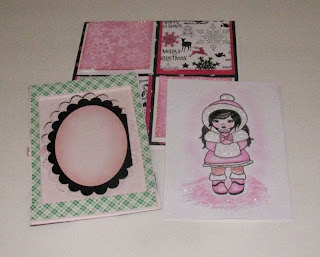
This is what it should look like when you have completely secured your image to the window.
Now your have your completed shaker window, and all you have to do is decide where you are going to place it on your card, and then glue it down.
Your shaker material should flow freely within the window if all was done correctly, and you are ready to give your fun, interactive card to someone special in your life.

I would absolutely love to see your shaker project that you try and hope that this tutorial will make it a little easier as well as possibly inspire you to try one of your own if you haven't done one before. I am happy to answer any questions that you have or look at your links of your projects if you wish to contact me, and thank you very much for taking the time to view my tutorial.
http://creativecardcorner.blogspot.com/
Have a wonderful day, and Happy Crafting! : )

Thank you Carolyn, what a wonderful tutorial. If any of you give this a try, PLEASE come back and leave us a link, so we can check it out :) As always, we would love to hear your thoughts and comments :)

Priscilla

Tuesday, September 29, 2009

Midnight Madness Week #21 (MMSC21)

Our Month end Winner for
DRS Designs $50 Voucher is....
Random Integer Generator
Here are your random numbers:208
Timestamp: 2009-09-30 18:28:50 UTC
Our Month end Charlotte's Challenge
Blog Candy winner is...
Random Integer Generator
Here are your random numbers:288
Timestamp: 2009-09-30 18:31:31 UTC
Our Bonus Winner for MMSC20 is....
Random Integer Generator
Here are your random numbers:70
Timestamp: 2009-09-30 18:15:22 UTC
CONGRATULATIONS TO OUR WINNERS!!
plesae contact me via email so I can forward your info to our sponsors.
Thank you to everyone who played this month!
~~~~~~~~~~~~~~~~~~~~~~~~~~~~~~~~~~~~
Before we get into this weeks Sketch post, I wanted to invite those of you who have not entered the Workbox contest posted at the top of this blog, to please do so. It is very exciting and someone has to win right? It could be you :) This is the first sketch week for the Oct Months giveaways and there is a lot to cover. NOTE: I added a link to the top of my side bar for your convenience. When you visit looking for our most current sketch challenge posts, just click on that link and it will take you straight to them. As a special way to thank our players and welcome new ones, we will be hosting our very 1st Halloween/Fall themed Midnight Madness Blog Hop.....Beginning October 16th at 8 a.m. EST and ending October 20th at 12 a.m. Midnight. AND OH WILL THERE BE PRIZES....... 25 prizes to be exact.

One Grand Prize random drawing

350th Brand New Sketch Player SPECIAL Prize

13 "Cards from the Crypt" (picked by our very own DT members from the MMSC archives)

10 random Package winners

This is your last DAY to get in on the drawings for the Sept Months Giveaways and the MMSC20 weekly bonus prize. You have till Midnight EST 9-29-09 to get your MMSC20 entries in to qualify. One winner will be drawn for each giveaway on Wednesday, so be sure to check back for that. If you miss the deadline, you are still welcome to link up to Mr Linky, but any entries after the "LAST CALL" will not be in the drawing.

MIDNIGHT MADNESS MASTERPIECE AWARD
Each week we are awarding a special Badge Award to one person for their outstanding sketch submission. If you would like to be considered for this award, please make sure your card link is posted to Mr. Linky by Sunday of each week. This is our way of let you know how wonderfully talented you are and how much we appreciate you sharing your craft with us. This week we are proud to say the“MIDNIGHT MADNESS MASTERPIECE” Gold Star Award goes to.....

#3. Kathrin aka Kruemel
Enjoy your award and please display it proudly!
(if you would like the blinkie code, just email me ;)
Sketch Challenge Star Award MMM


The "NEW" MM REMARKABLES AWARD!!
The Midnight Madness Team has created a very special award called The “Midnight Madness Remarkables” Award !! We would like to acknowledge those entries that are just exceptionally Remarkable!! During our voting each week, due to the caliber of the cards entered in our challenges, we end up with so many ties and close votes, so this Fairy logo is for those recipients to display proudly. If you would each like to take our fairy logo for your side bar, she would love to come stay with you.

Thank you all for playing and please help me in congratulating our “Midnight Madness Remarkables” award winners…..
28. Rosette
40. sassy
53. Juut

Our Sponsor for the month of
October is....

The Midnight Madness Team is just thrilled with out sponsor this month. Chelsea from Gurlee Girl Design was VERY GENEROUS to our entire team. You will be getting a big treat, because we get to share some of her wonderful images on our sketch samples this month. Chelsea is a very talented artist and I just love her work. Here is a little note from her she wanted me to post.
“I am so excited to be sponsoring MMSC for the month of October. Thank you to the DT for using my stamp images in their creations. On June of 2009, Gurlee Girl clear stamp design was launched. Our first summer collection consists of three adorable, sweet and very girly designs. Our second Winter Holiday Collection 2009 was just recently release with five Gurlee Girl designs. Please be sure to stop by the Gurlee Girl shop to check out all the girls! I hope to continue my passion for drawing, designing, and crafting with the kind support that have been given to me. With sincere appreciation, Chelsea"


Winner will get 3 free stamps of their choice AND a $50 Certificate that is valid till June 2010. WOWZER :)

Thank you again Chelsea
Month End Drawing #1


Sue - McMahon Five Designs
“Challenge Blog Candy”??? Oh Yeah!! Once again, we are doubling the fun here!! Just like last month we have a bonus for our players.. Our team member Sue has so generously offered up some challenge blog candy for the month of October. For every entry to the Midnight Madness Sketch Challenges this next month, you will go in the drawing for the GRAND PRIZE Month end awards. As an added BONUS…if you "FOLLOW" Sue's blog and leave her a comment, you will get an EXTRA entry in the month end drawing, so hop on over to Sues’s blog, stay a spell, post a comment stating it is for the Oct MM Blog Challenge Candy and be sure to click the follow button. Thank you Sue for this SUPER yummy Candy donation. Check out her FANTASTIC “Challenge Blog Candy” below!!
Month End Drawing #2


Sue's Challenge Bog candy includes.

1 Aurora Flourish Stamp Set (17 stamps)
1 Birthday Present Stamp
4 Spools Ribbon (36 feet)
2 6 x 6 sheets of Rosewood paper
2 Die Cut Envy-Lopes
1 Stampin’ Up! Classy Brassy
10 Hickory Pre-Cut Wood Paper Strips
1 set of heart and flower stickers
1 set of vintage travel embellishments
1 set of baby embellishments
10 Assorted Copper Metal tags
1 Stampin’ Up Sheet of Rub-on’s
1 Believe Silver Metal Charm
1 Faith Silver Metal Charm

~~~~~~~~~~~~~~~~~~~~~~~~~~~

OUR WEEKLY BONUS SPONSOR THIS WEEK IS.....
Belles 'n Whistles is pleased to offer an exclusive stampline created by the wonderful artist Elisabeth Bell! Manufactured here in the United States, our red-rubber stamps are deeply etched, highly detailed, foam-mounted and pre-cut, ready for immediate use! The delightful images will make priceless editions to your rubber stamp collection. Truly, these are "Stamps that tickle the heartstrings!" Summer from over at Belles ‘n Whistles is giving away two adorable stamps for the Bonus winner of this weeks Sketch challenge (MMSC21) the Little Witch with Broom and Scarecrow and Little Wizard as seen below. Thank you for your generosity.

~~~~~~~~~~~~~~~~~~~~~~~~~~ .
NOW FOR OUR WEEK #21
SKETCH CHALLENGE

Below are the Design Teams samples this week and some are made with *Gurlee Girl Design images. Be sure to click on them to find out all the details of each one.


Here is Week #21 sketch (MMSC21)

*Priscilla - "priscillastyles"


Carol-Chocolate, Crafts, & Bears!


*Denise - kc242 Designs by Denise


Jane - The Paper Affair


*Michelle - Daydreams by Michelle


Lovely Linda's - Craft Central!!


*Phyllis - SparklePlenty1000


Kimmie - kimmie kaye's designs

* Carolyn - Creative Card Corner


Chris - Twinkles Glow with Stamps


*Sue - McMahon Five Designs


*Jeni - Jeni's Custom Cards


Sonya - The Pink Paper Penguin


*Charlotte - Designs From Within

YOUR REMINDERS!!!....
1. You need to be a “FOLLOWER”
2.
The “Midnight Madness LOGO BADGE/LINK” should be displayed on your blog
3. Your card post needs to have a Hyperlink back to this blog.
4. Tag with MMSC21 when uploading to galleries.
5. Only ONE entry per person per week please (If you choose to enter more than one, ONLY your FIRST entry will be judged and entered in the drawings)
6.
Enter your project to Mr. Linky below

7. Leave a Comment below.
8.
***Read the General Rules**

IT'S THAT EASY!!
Note: if for any reason, Mr. Linky is not displayed directly below, please just add your link address for your project when you comment. If Mr. Linky is not here when you are, you could also check back again in a little while.

MMSC21 ENTRY DEADLINE Oct 6th MIDNIGHT EST
When you add your name to Mr. Linky, some how add an initial or make your name distinguished..(ie Lisa A. or Lisa B.) this will be very helpful with the more frequently used names so we can differentiate the players for our Mad Money Drawings.


Monday, September 28, 2009

Midnight Madness by Priscilla MMSC21

HOT COCOA?


Thanks for stopping in! :) This was made for MMSC21 , come play with us. We have a lot of fun things going on here at the Midnight Madness blog, so let this card inspirer you to grab a cup of cocoa and stay awhile. This card was made with the cuties stamp from Gurlee Girl Design. I am so proud, because once again I was able to finish the inside and make a “Thinking Inside the Box” custom matching envelope. I will keep my post short, but I will leave you with one questions… are you a multi tasker? I have to be!! My husband does not know how I do it. I can be down loading pictures on the computer for my blog post, talking on the phone, doing dishes and breaking up my kids fighting over a toy all at the same time. My husband can only do one thing at a time….anyone else out there live in a home like mine??? LOL Anyway, enjoy your time here at the Midnight Madness blog and be sure to take advantage of all that it has to offer. As always, I would love to hear your thoughts, comments or concerns.

Wednesday, September 23, 2009

Our October Guest Designing Diva!!!

Welcome Linda Lucas :) I am so excited to announce our October Guest Designer Diva. Linda is a wonderful card maker and Layout artists. She is extremely talented and her work will bring so much inspiration to the Midnight Madness Sketch Challenges this next month. Here is a little bit about her.....

'I am a New Zealand born girl living in Canberra Australia. I have been married to my FABULOUS husband 18 years this October!! Together we have three great children who complete our family and fill our home with love, laughter and an incredible amount of noise! I have always loved being creative, I was taught to knit when I was 6, by my Mother and have knitted and done various hand crafts ever since. Drawing and colouring always fascinated me, coming from a long time of artists on my Mother's side...this creative bug was bound to get me and it 'hit me hard!' I started cardmaking nearly two years ago when a neighbour asked me to her Stampin' Up Workshop and I thought 'how boring' but went to support her - what awhirlwind of a journey it has been since then I have rapidly crossed that fine line that separates addiction from obsession and I am loving it!! I am both thrilled and honored to be a Guest Design Team Member for the MMSC - I have played from the very first sketch and love the inspiration that these fabulously gifted ladies being each week! Thank you for having me - I looking forward to this part of my creative journey and seeing your 'works from the heart!'

Linda will be helping us choose our November Guest Designing Diva, so keep those creative juices flowing and if you have not let it known yet, be sure to let us know you are interested in being one of our Guest Designer. Please stop by her blog and give her a big shout out!

“CONGRATULATIONS”

Linda, we are just thrilled to have you with us, and below is your Guest Diva Logo. Please display it proudly :)


We would like to thank EVERYONE who entered our diva challenge. We have so many super talented people playing our challenges!! You have no idea how hard it is to vote each month. We will be looking for a guest designer each month, so please keep playing because we love the inspiration everyone brings to us. If it was not for our players, there really would not be a Midnight Madness Sketch Challenges. So Thank you :) For a more details on what we are looking for click HERE and scroll down.

You could be the NEXT Guest Diva :)

Mid Week Midnight Madness "Real Wood Paper Tutorial"

Below is this weeks fabulous Tutorial from our very own Design Team Member Sue.
"Life's a Beach Digi & Real Wood Paper Tutorial "

I'm so excited to finally be able to show you this digi and real wood paper fence tutorial! Priscilla had asked me to do a tutorial for her using my wood paper I have in my store. After being in Florida at CHA in July, I came up with this idea and drew it on the plane flying back home! Great times with Great Friends create Great Ideas! :) Let's get started!

I printed the beach digi on one end of the paper, pulled the paper out of the printer and turned it around and printed again. I have Copics, Scissors, Sanding Block and 3 strips of Walnut Pre-cut Wood Paper.
I colored both images with my Copics. I did not color the sky and umbrella on one of them as I did cut that out.
I cut one Walnut Wood Paper Pre-cut Strip into random lengths.
I cut grooves in the tops of several pieces. Angled the edges of several others. I punched knot holes in several with a small oval paper punch. I used the sanding block on the top of all of them to give them a worn/weathered look.
I applied pieces of 1/4" Scor-Tape (from our previous MM Sponsor, Scor-Pal) to the backs of each wood strip.
I figured out how I wanted them laid out on the image and removed the paper backing from the Scor-Tape.
Flipped the pieces over and stuck them to the image.
I cut out my 2nd Beach Digi image with my Stampin' Up Knife.

I'm showing you this so you DON'T do what I did. LOL! Learn from my mistakes! I stuck the 2nd Digi image on top of the first digi/wood image. Then realized I wasn't going to be able to cut the circle shape I was planning. So, off came the top layer and the dimensionals did peel a little of the coloring off the pink & purple surfboard. But no worries, it will be covered up again.
I used my largest circle Nestie as my template. I traced the outer edge with a pencil.
Using my scissors, I cut on the pencil line.
Now you can add your 2nd Digi layer! :)
Flip it over and trace the circle shape onto the 2nd Digi layer.
Cut again on the pencil line for a perfect match!
Of course, every image needs Stickles! I used Strawberry Ice on the butterfly, Holly on the vine, Cinnamon and Platinum on the beach sand, Gold on the flowers on the yellow and orange surfboard, Gunmetal on the Blue and Aqua surfboard, Yellow on the top of the beach umbrella, Icicle on the umbrella fringe and Frosted Lace on the Aqua background paper scalloped edges.
I used my Cricut and Wild Card Cartridge to cut the background circles, scallops and card. I added the Life's A Beach Digi along with Oval Stampin' Up! hardware. A little raffia tied here and there. Life's A Beach Card Complete!
Below is a list of links for where to purchase these items!


Thank you Sue, what a wonderful tutorial. If any of you give this a try, PLEASE come back and leave us a link, so we can check it out :) As always, we would love to hear your thoughts and comments :)

Priscilla