Welcome to the Mid Week MM Tutorial!!
If you are looking for our current Sketch Challenge (MMSC26) click HERE.
If you are looking for our current Sketch Challenge (MMSC26) click HERE.
Below is this weeks fabulous Tutorial from our very own Carol.
"How to make table Pumpkins"
 Hello everyone! As promised from the Midnight Madness Blog Hop, I am going to show you how to make these adorable pumpkins so that you can make them in time for Thanksgiving to have for your table place settings to impress your guest!
 For 1 (one) pumpkin you are going to need the following material.
1 sheet of your choice of orange card stock (1 sheet will yield 12 scallops-you need 11 scallops for 1 pumpkin
Scraps of brown and green cardstock for leaves and stem
1 scallop spellbinder nestie, I used the next size down from the largest- it measures approx. 3-1/2 inches end to end.
Distress Ink-I used tea dye
A small brush to apply distress ink
Some type of instrument to roll your cardstock- I have a piercing tool here, or a toothpick works well.
Any leaf punch from your collection (you can see mine has really been loved...LOL)
Paper trimmer
Glue Runner
Any kind of bottled glue
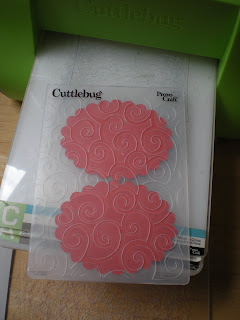 It is optional to emboss the pieces, it's up to you. For the blog hop pumpkin, I did not emboss. I left them plain. You can fit two per folder as shown here.
 I distress inked all the edges of my scallops (total of 11) with a brush. I like to have control of the ink so that is why I used the brush. It's just a matter of preference.
 Once you have your scallops distressed, you are going to fold all of these scallops in half. Make sure that they are truly in half. You are going to fold these with the raised embossing and the distress inking to the inside of the fold so that it will show in the end result to the outside.
 Now we are going to start to assemble all of these scallops!
 Run you tape at along the folded end and start putting your folded scallops one on to of the other. Be sure to use your tape on each one and line them up evenly.
 It should look like this once your get them all lined up together.
 Now take the top and the bottom and join together as seen above. Run some tape as close to the edge as possible and seal.
 You see it starting to take shape here nicely. Tape each of the 11 loose ends together.
 Here is another close up where you see I am taking my time to line them up nicely so that the scallops will match.
 Once you get all the loose petal attached we are going to flip the pumpkin to the bottom and cut out the middle scallop, this makes the bottom flat and will allow your pumpkin to stand straight.
 Now we are going to make the stem, curly vines, and leaves. You are going to cut a piece of scrap brown approx. 1 inch by 3", wrap around your toothpick tightly, tape the end and secure the roll, place some glue on the end and push it down into the middle hole of your pumpkin and leave about 5/8" showing.
 Cut your scrap green cardstock about 1/4"-1/2" x 4" and roll on a toothpick.
 Take the end of each of the curly vine and glue one on either side of the stem.
 Cut out two leaves and glue opposite the vines on either end.
 And here is your end product. I hope you have enjoyed this tutorial. If you use my tutorial, I would love to see a picture of your pumpkin. I would be happy to come and visit you at your blog or the place where you pictures are hosted. Just leave me a comment on my blog at Chocolate Crafts and Bears Oh My and I will visit. Thank you all for all the wonderful comments regarding this little pumpkin from the blog hop, it was so nice to see how much you enjoyed it and I am happy to help you make your own!
Hugs,
Carol
 Hello everyone! As promised from the Midnight Madness Blog Hop, I am going to show you how to make these adorable pumpkins so that you can make them in time for Thanksgiving to have for your table place settings to impress your guest!
 For 1 (one) pumpkin you are going to need the following material.
1 sheet of your choice of orange card stock (1 sheet will yield 12 scallops-you need 11 scallops for 1 pumpkin
Scraps of brown and green cardstock for leaves and stem
1 scallop spellbinder nestie, I used the next size down from the largest- it measures approx. 3-1/2 inches end to end.
Distress Ink-I used tea dye
A small brush to apply distress ink
Some type of instrument to roll your cardstock- I have a piercing tool here, or a toothpick works well.
Any leaf punch from your collection (you can see mine has really been loved...LOL)
Paper trimmer
Glue Runner
Any kind of bottled glue
Optional-Cuttlebug embossing folder You will need to cut your 12 x 12 orange card stock into four (4) - 3" strips.
 Run your cardstock through the cuttlebug with the scalloped die cut. You will run lengthwise and get three cuts per strip. Cut 11 scallops.
 You will need to cut your 12 x 12 orange card stock into four (4) - 3" strips.
 Run your cardstock through the cuttlebug with the scalloped die cut. You will run lengthwise and get three cuts per strip. Cut 11 scallops.
 It is optional to emboss the pieces, it's up to you. For the blog hop pumpkin, I did not emboss. I left them plain. You can fit two per folder as shown here.
 I distress inked all the edges of my scallops (total of 11) with a brush. I like to have control of the ink so that is why I used the brush. It's just a matter of preference.
 Once you have your scallops distressed, you are going to fold all of these scallops in half. Make sure that they are truly in half. You are going to fold these with the raised embossing and the distress inking to the inside of the fold so that it will show in the end result to the outside.
 Now we are going to start to assemble all of these scallops!
 Run you tape at along the folded end and start putting your folded scallops one on to of the other. Be sure to use your tape on each one and line them up evenly.
 It should look like this once your get them all lined up together.
 Now take the top and the bottom and join together as seen above. Run some tape as close to the edge as possible and seal.
 You see it starting to take shape here nicely. Tape each of the 11 loose ends together.
 Here is another close up where you see I am taking my time to line them up nicely so that the scallops will match.
 Once you get all the loose petal attached we are going to flip the pumpkin to the bottom and cut out the middle scallop, this makes the bottom flat and will allow your pumpkin to stand straight.
 Now we are going to make the stem, curly vines, and leaves. You are going to cut a piece of scrap brown approx. 1 inch by 3", wrap around your toothpick tightly, tape the end and secure the roll, place some glue on the end and push it down into the middle hole of your pumpkin and leave about 5/8" showing.
 Cut your scrap green cardstock about 1/4"-1/2" x 4" and roll on a toothpick.
 Take the end of each of the curly vine and glue one on either side of the stem.
 Cut out two leaves and glue opposite the vines on either end.
 And here is your end product. I hope you have enjoyed this tutorial. If you use my tutorial, I would love to see a picture of your pumpkin. I would be happy to come and visit you at your blog or the place where you pictures are hosted. Just leave me a comment on my blog at Chocolate Crafts and Bears Oh My and I will visit. Thank you all for all the wonderful comments regarding this little pumpkin from the blog hop, it was so nice to see how much you enjoyed it and I am happy to help you make your own!
Hugs,
Carol
Thank you Carol these look like so much fun to make :) And a special thank you for stepping in to help with the post this week.
Priscilla


Que bonito que te quedo!!muy original!!!Saludos!!
ReplyDeleteThat is just too cute, I may have to make some of these for my daughters Pre-K Thanksgiving Feast. So cute, Thank you! Staci
ReplyDeleteWOWZER! Carol, that is just awesome!! What a wonderful centerpiece this would make!! Very nice tut!! Thankyou!! ;)
ReplyDeleteFabulous centerpiece tutorial, Carol! I really enjoyed this cute pumpkin being made, thanks for putting this together :)
ReplyDeleteThank you Carol, I really do like those little Pumpkins!
ReplyDeleteAWESOME tutorial, Carol. Those little pumpkins are just toooo cute. My granddaughters will love helping me make some!!
ReplyDeletePhyllis MMDT
Your little pumpkin is adorable. Thanks for sharing directions. Marsha
ReplyDeleteoh my gosh, this is too cute! thanks for the inspiration :D
ReplyDeleteThis is so great! May have to make something like these for Thanksgiving :)
ReplyDeleteCarol I have been waiting for this tutorial....love, love, love your pumpkin and hope to give it a go for Thanksgiving!
ReplyDeleteAbby:)
Carol this is great! I was jut looking at instructions on one of these and now you've made it that much easier to do! I love it and you sure did a great job with it! Thanks so much!!!
ReplyDeleteHey Carol,
ReplyDeleteWhat a kewl idea.........thanks for sharing these simple instructions with us all!
Shell~Alaska
thank you for this tutorial. it may be late for me but will be early for next halloween.
ReplyDeleteThanks for sharing this fabulous tutorial. A great idea for Thanksgiving dinner!
ReplyDeleteHugs,
Cabio
This comment has been removed by the author.
ReplyDeletethank you so much for it! its so nice =)
ReplyDeleteLove this! Great tutorial, wish I had some nesties to use!
ReplyDeleteI don't have a cutter bug but if I did I would definitely make this!
ReplyDeleteawesome tutorial! Thank you!
ReplyDeletePrecious Carol!!!!
ReplyDeleteThat is so cute, I would have to try these my self.
ReplyDeleter4
what a great tutorial and such a wonderful pumpkin
ReplyDeleteFantastic and genius idea to make these cute pumpkins! Thank you for sharing your great tutorial!!!
ReplyDeleteFabulous project and tutorial! Thank you!
ReplyDeleteYou're invited to come get a FREE digis party favor and enter our HUGE prize drawing today!
hugs!
Thanks so much for the tutorial!! My friends and I made some, I posted them on my blog {here} and gave a shout out to this post :D
ReplyDeleteSuch a fun and elegant table decoration! The embossing adds such a nice accent to these cute little pumpkins!!
ReplyDeleteThis is a very creative idea Carol and a great tutorial.
ReplyDelete~Chris
What a bummer I'm too late for Tahnksgiving here in Canada. Will definitely try this so I can do it next year! Love it.
ReplyDeleteWOW I loved this pumpkin tutorial!!!! Carol You Rock!!! I made one last friday to take along to craft fair my daughter and I participated in and WHALA it was admired and sold right away!! Yeah!! View HERE
ReplyDeleteBlessings
Mary Lou
I loved this idea so much, that I posted a link to it back in Nov. So cute! Never did get to make them though. Maybe next year!
ReplyDelete