Welcome to the Mid Week MM Tutorial!!
If you are looking for our current Sketch Challenge (MMSC24) click HERE.
If you are looking for our current Sketch Challenge (MMSC24) click HERE.
Below is this weeks fabulous Tutorial from our very own Design Team Member Carol.
"How to Make a Mug of Cocoa"
 Today, I am going to show you how to make a mug to hold cocoa. This is something that really happened by accident. I guess you could say, I really got into this card and just kept adding things as I went along. Who could resist this sweet Cocoa Girl that Chelsea created. The more I look at her the more I can think of things to make with her. Just think how wonderful this would be as a get well card. Instead of including a Cocoa packet, you could include a Cup-of-Soup packet. The same thing goes for tea or coffee. You are only limited by your imagination!!!
 So here you have my card that I originally started with a pocket for the recipes for Cocoa. My card is 6" x 6" and the pocket is 6" x 3-1/4". This will hold your mug nicely. Make sure to either stitch your pocket or use a strong adhesive so it will not pull apart when you place the mug inside. It is optional to put the recipes inside, but like I said...this all happened accidentally and I am keeping the recipes in here. lol
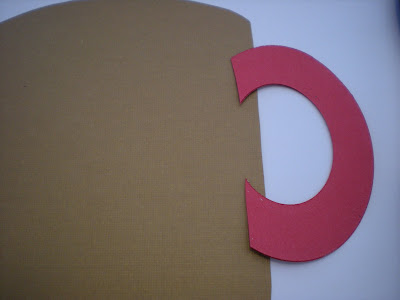
 You are going to get the template for your mug here at Mirkwood Designs. It is actually a template for a card, but I modified it. You want to make sure your printed template is 10 inches tall. So you will need to print on 8-1/2 x 11 paper. I glued this template to an old cereal box, cut the cup in half on the dotted line and cut the handle off. This is what you are going to use to trace on your card stock. After cutting, you could emboss these pieces.
 Once you have your card stock cut out, then you are going to cut out the handle. I wanted a bulkier handle than the one on the template. So I used two dies from my oval nesties the 3-1/4" and the 2". Place those nesties as you see here in the picture. I cut both handles out at the same time. I used two pieces of card stock. It is optional if you want to emboss the handles after cutting. I did on my sample one, but not on my finished one. It's up to you.
 Next we will assemble the handle. I found that you need to cut to size for placing inside the mug portion of this holder, otherwise your cocoa packet will not slip in and out of this nicely. Measure down 1/2 inch from the top and place a mark where you are going to place the top of the handle and 3-3/4 down like you see in this picture.
 Now you are going to want to cut away a portion of this handle. I just guessed at about how big I wanted my handle. You then want to place a small amount of adhesive to keep it in place. Put the top piece on and either sew or use a nice strong adhesive so that it won't come apart when you put your goodies inside.
 So here is what it looks like after you put it together. I used a 3-1/4 x 3-1/4 piece of decorative paper to match my card in the front. Just as an idea, I thought this would be really cute with a picture of a child framed on the front of this as well.
 We are going to assemble the flower next. As you can see, I used every little bit of this wonderful wood paper. I only have shreds left. I just love this stuff. I have a variety here of punches for making the flower. The base of the flower is made by punching 2 of the largest punch from the cork. The middle is 2 punches from the medium punch of the sitka wood, and the small punch is only one punch from cork. I have shown a brad here that I use to keep the flower all together.
 You are going to punch a little hole in the middle of all the flowers for ease in assembling on the brad. The tool I am using comes from the Cricut tool kit. I can't tell you how much I use this...it is so versatile I would buy that tool kit again just for that!
 Put the smallest flower on the brad first, then the two medium and then the large. Twist so all petals show. This is how your flower should look. I put some stickles just on the sitka wood paper because I want to keep the natural look of the cork.
 You can decorate your mug as you like. As you can see here, I put some feathers with my flower and attached my matching image and a bow on the handle. I would have put a charm on my bow if I could have found a mug or a spoon one...and that would have been really cute.
 This is a picture of what the mug looks like inside the card. You can see it fits perfectly!
 Here is a picture of the whole project. The card, the envelope, the recipes, and the mug.
 Thank you for stopping by to view my tutorial for this project. I really appreciate it and would love to hear what you think about it. You reach me at Chocolate Crafts and Bears, Oh My. If you have any questions, I would be happy to answer them. If you should make this project, I would love to come and see it.
 Today, I am going to show you how to make a mug to hold cocoa. This is something that really happened by accident. I guess you could say, I really got into this card and just kept adding things as I went along. Who could resist this sweet Cocoa Girl that Chelsea created. The more I look at her the more I can think of things to make with her. Just think how wonderful this would be as a get well card. Instead of including a Cocoa packet, you could include a Cup-of-Soup packet. The same thing goes for tea or coffee. You are only limited by your imagination!!!
 So here you have my card that I originally started with a pocket for the recipes for Cocoa. My card is 6" x 6" and the pocket is 6" x 3-1/4". This will hold your mug nicely. Make sure to either stitch your pocket or use a strong adhesive so it will not pull apart when you place the mug inside. It is optional to put the recipes inside, but like I said...this all happened accidentally and I am keeping the recipes in here. lol
 You are going to get the template for your mug here at Mirkwood Designs. It is actually a template for a card, but I modified it. You want to make sure your printed template is 10 inches tall. So you will need to print on 8-1/2 x 11 paper. I glued this template to an old cereal box, cut the cup in half on the dotted line and cut the handle off. This is what you are going to use to trace on your card stock. After cutting, you could emboss these pieces.
 Once you have your card stock cut out, then you are going to cut out the handle. I wanted a bulkier handle than the one on the template. So I used two dies from my oval nesties the 3-1/4" and the 2". Place those nesties as you see here in the picture. I cut both handles out at the same time. I used two pieces of card stock. It is optional if you want to emboss the handles after cutting. I did on my sample one, but not on my finished one. It's up to you.
 Next we will assemble the handle. I found that you need to cut to size for placing inside the mug portion of this holder, otherwise your cocoa packet will not slip in and out of this nicely. Measure down 1/2 inch from the top and place a mark where you are going to place the top of the handle and 3-3/4 down like you see in this picture.
 Now you are going to want to cut away a portion of this handle. I just guessed at about how big I wanted my handle. You then want to place a small amount of adhesive to keep it in place. Put the top piece on and either sew or use a nice strong adhesive so that it won't come apart when you put your goodies inside.
 So here is what it looks like after you put it together. I used a 3-1/4 x 3-1/4 piece of decorative paper to match my card in the front. Just as an idea, I thought this would be really cute with a picture of a child framed on the front of this as well.
 We are going to assemble the flower next. As you can see, I used every little bit of this wonderful wood paper. I only have shreds left. I just love this stuff. I have a variety here of punches for making the flower. The base of the flower is made by punching 2 of the largest punch from the cork. The middle is 2 punches from the medium punch of the sitka wood, and the small punch is only one punch from cork. I have shown a brad here that I use to keep the flower all together.
 You are going to punch a little hole in the middle of all the flowers for ease in assembling on the brad. The tool I am using comes from the Cricut tool kit. I can't tell you how much I use this...it is so versatile I would buy that tool kit again just for that!
 Put the smallest flower on the brad first, then the two medium and then the large. Twist so all petals show. This is how your flower should look. I put some stickles just on the sitka wood paper because I want to keep the natural look of the cork.
 You can decorate your mug as you like. As you can see here, I put some feathers with my flower and attached my matching image and a bow on the handle. I would have put a charm on my bow if I could have found a mug or a spoon one...and that would have been really cute.
 This is a picture of what the mug looks like inside the card. You can see it fits perfectly!
 Here is a picture of the whole project. The card, the envelope, the recipes, and the mug.
 Thank you for stopping by to view my tutorial for this project. I really appreciate it and would love to hear what you think about it. You reach me at Chocolate Crafts and Bears, Oh My. If you have any questions, I would be happy to answer them. If you should make this project, I would love to come and see it.
 Thank you Carol, you did an Awesome Job with this tutorial. If you decide to give any part of this tutorial a try, please come back and share your project with us. We would love to come take a look. As always, we would love to hear your thoughts and comments :)
THANK YOU FOR STOPPING BY :)
Priscilla


What a fantastic gift this would make! I love everything! The wood flowers are amazing! Thank you so much for sharing your inspiration with all of us!!
ReplyDeleteCassandra
That is such a great gift idea. Love this tutorial and the flowers are gorgeous!
ReplyDeleteHugs,
Cabio
Wow... Thanks for tutorial!!
ReplyDeleteHugs from Norway :)
What a great gift! tfs
ReplyDeleteI am sorry Carol - I am not sending my friend over to look at this - I am wanting them to think I am amazing when I case you!!! LOL! Did I have you worried!?!? Seriously though, I love this card and mug inside a card!!! What a clever girl you are, you have so many details - those wood flowers are stunning!! I am definitely going to be making this and your detailed instructions make it easier - thank you Carol - you ROCK!!! {{{hugs}}}
ReplyDeleteTHUD!!!! That's the sound of my jaw hitting the floor!! What an amazing project and tutorial! TFS!!
ReplyDeleteawesome tutorial! I agree there are tons of uses for this card. I just printed off the template and will try it out tonight. Thank you!
ReplyDeleteWOW!! What an awesome project!! You are such a clever girl and your wood flowers are wonderful!! Very informative and helpful, I think even a project challenged person like me could benefit from this lovely tutorial. Great job!!
ReplyDeletePhyllis MMDesign Team
Wow fantastic project thanks so much my friends hubby has swine flu so im gonna make him a card with Lemsip in!
ReplyDeletethanks for great tutorial and inspiring ideas .Sometimes the best ideas come to us through mistakes or by chance when card making thanks for this one!
hugs judex
I gotta rave about it too. Love the idea and so fitting. Thank you for the template and tutorial, I see that in my future. SO creative, fabulous. Jane
ReplyDeleteWOW what a FANTASTIC GIFT!!! Thanks so much for the AWESOME Tutorial!
ReplyDeleteHi Carol!! WOW!! These are just fabulous!! I love your fun tutorial!! I love your idea!! TFS! HUGS
ReplyDeleteWhat a beautiful project.....such a wonderful idea for a cute little gift!! Your tutorial is super!! 8)
ReplyDeleteThis is beautiful!! Thank you so much for sharing!
ReplyDeleteWhat a gorgeous matching set Carol!! I Love it, great tutorial and very clever idea :) Thanks for teaching us, we want more! ~hugs, Jeni
ReplyDeleteSuper idea! I'm definitely going to try this!
ReplyDeleteOMG how cute is that Mug??? I so need to get a cricut! LOL
ReplyDeleteI am a DT member for Purple Cows, they are having a DT contest and a consumer contest, I could win BIG if i get enough followers on their blog...could you go post that PINKY sent you and follow them?
http://sadiepurplecow.blogspot.com/
I have a HUGE RAK on my blog for it as well!
All the links are on my blog!
hi....have emailed you...but i really dont know what im doing i feel so ill....ihope i have done it right i sure could do with a nice mug of something...fabby project..hugs sasyx
ReplyDeleteUpdate: I have had a few requests for the recipes that I have on the inserts in this card. I have posted the links to the recipes at the bottom of the tutorial on my blog.
ReplyDeleteEnjoy
Carol
What a beautiful set. Thanks for sharing this tutorial with us.
ReplyDeleteSpectacular! I love "out of the box" ideas!
ReplyDeleteLaura
Layers of Color
cute...cant wait to make this
ReplyDeleteWhat a great tut! Thanks for posting this! I love your project and the punched flowers are better than Prismas!
ReplyDeleteNice job, thanks for taking the time to do this and share it.
ReplyDeleteThis comment has been removed by the author.
ReplyDelete