Ok, now to the fun. This tutorial was done by our very own
Jane. I love her altered project today. We have so many things that we just pitch that we could have a lot of fun with in the craft room don’t you think? Recycling, it is a beautiful thing :) Enjoy this super fun Halloween themed Tutorial.

Hello and Welcome to the tutorial on an altered project, a Halloween Candy Container. I thought this Container turned out very nice, I hope you do to. This one is a long one so hold on for the ride. I know some of you know how to do this but even so, it is always fun to see how other people would do the creating. I took lots of pictures of the steps just to ensure that we don't miss anything. Let's get started:
 I used an empty Raw Almond Container, it really does not matter what kind of a container you use, the size is up to you depending on how much treats you want the container to hold. I did not remove the label, I just covered it up.
 I try and lay out all my supplies I think I will use when I start a project, sometimes I don't use every item I lay out and sometimes I find I need to go get something else, I think I was close here. I wanted to show you the stamp set I used. I purchased this set at Michael's just this season.
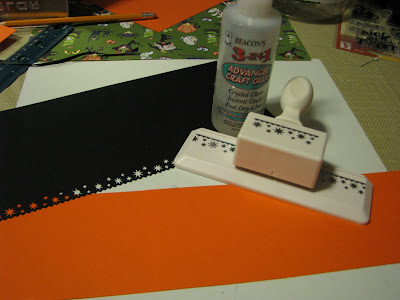
 The papers I used: The orange paper is the bottom layer, I wanted to cover the label so I measured how wide that was and made this a tad bit wider than that. You do not want to make it too wide otherwise you will start running into the curve of the container and then your label will not lay flat. So the orange paper, then the black paper, I edged punched both the top and the bottom of the paper with Martha Stewart's edge paper, the pattern is the stars.
 Now I added a patterned paper, I like this one here and I also punched the edges again with the star punch.
 I am now going to add my stamped images to the container band, I used black ink and used the sharpie to refine some of the stamped images.
 I first used a color pencil to color in my images and then notice I now inked them up. I used a make-up sponge wedge and used black ink around all the sides and then randomly added orange and green ink to give it some more color.
 I added a ribbon across the band and glued on my images and four buttons of green, orange and black. You can now glue this on your container. Do several inch sections at a time only gluing that section for now, hold a short while to let the glue dry, making sure that it is flat and then continue until the band is all around your container, be sure to adjust label if necessary so your label (if you left one on) is covered and you have no bubbles. Don't be in a hurry now, this is very important.
 Starting on the tag; Stamp the image, I inked it up like I did the other images above.
 Now I am going to glue the tag onto the orange card stock and cut the orange card stock into the shape of the tag, then use a hole punch to make one hole for the ribbon.
 Here is the ribbon I used, it was just what I had on hand, I also used one half of a black pipe cleaner to give it more texture and dimension.
 The tag is done. Now just tie it onto the container.
 Buy candy and add to your container and you're ready to either give as a gift or you to enjoy yourself!

Thank you for viewing my first tutorial, forgive my shadowed pictures, I hope to do more in the future. If there is anything you would like to see, please comment and we will see what we can come up with here at Midnight Madness. Sincerely Jane, "The Paper Affair"
Well done Jane :) that was fun. Thank you everyone for stopping by and be sure to leave us a link to your altered project..we would love to come check it out :) Enjoy your day!!


Oh, I just love this Jane!! You know that I am going to want to try something like this ;) I have all kinds of containers around here that I can alter and have fun with. Be on the look out for me following in your footsteps. Thanks for the fabulous tutorial! Now, to get to work.
ReplyDeleteCarolyn
Great tutorial! Thank you!!!
ReplyDeleteJane, congrats on your first tutorial...you are braver than me!!! I love this idea and you pulled it off great...what a nice little treat container for someone special!
ReplyDeleteHugs,
Charlotte
Thanks so much Jane for the fabulous tutorial!! What a really adorable container!! the colors and ribbons are perfect!! :) Love that MS border punch too!
ReplyDeleteWhat a wonderfully clever idea! Thanks for an awesome tutorial ... very inspiring! Guess I'd better start eating those snacks in the pantry so I have some containers emptied and can start altering, LOL!! Great job ... thanks again!
ReplyDeleteExcellent tutorial, and it came up so stunning. well done and thanks for sharing your talent.
ReplyDeletePinky
This is gorgeous, love the stamps and the border punch but what do I love most? The pipe cleaners :D They look like big fat spider legs poking out *g*
ReplyDeleteThis is wonderful and you are oh so right!! Why do we throw things like jars and boxes away and then buy storage containers and decanters. We are crafty, we are fully capable of reducing, reusing, recycling!! It's the least we could do after all the paper we use up, right!?!?! Wonderful altered creation, gets people thinking. Love the use of the punch too, it looks great, beautiful job on your first tutorial Jane!!
ReplyDeleteFabulous tutorial!! Not to mention a great idea! Your container is gorgeous!
ReplyDeleteFANTASTIC! This is super cool and fun and a great way to recycle!! TFS another great tutorial!!
ReplyDeleteVery neat project! Love the idea!
ReplyDeleteThis was a super awesome tutorial. I'm going to have to put my new knowledge to work asap.
ReplyDeleteCan't believe it's your first tutorial--awesome step by step instructions and photos. Thanks for the idea!
ReplyDeleteBravo Bravo Jane....I loved this. Not only did I discover that I can use that border punch other than for Christmas (I almost had buyers regret over it) but I think I now have a fantastic way to "Boo" my neighbors this year!!! I can't wait to try this out and you did awesome job with your first tutorial. I am so proud of you.
ReplyDeleteCarolH
Carol,
ReplyDeleteLOL. You can use that star border for so much more, like for Halloween or a teen card, "Rock Star" or a kids "You're a star" and for Birthday too - no buyers regret on that one.
Great Job, Jane! Using a holiday punch is terrific for the labels :) I had not thought of that, thank you for giving me more ideas on how to use my punches and make recycle containers into beautiful things! xox ~Jeni
ReplyDeleteGreat job!! Love those borders and your imgaes are so cute. I will try some!!
ReplyDeleteFANTASTIC tutorial Jane! Looks yummy!
ReplyDeleteche bella idea!!! ottimo tutorial, grazie!
ReplyDeleteSO cute!!!
ReplyDeleteThanks again for the inspiration, Jane. I posted my project on my blog today. What a fun idea, and I know that I will be doing more of these.
ReplyDeletehere's my project
Carolyn
What a wonderful an big candy. Thank you for the chance to win! It's a very nice tutorial.
ReplyDeletehugs,
silvia
Gorgeous container Jane!! Love how you inked up the images!! Beautiful results!! Awesome tutorial!!
ReplyDeleteThis is such a great project, its easy and pretty :) I have got a few spare jars I am going to do this with :)
ReplyDeleteCheryl
Great job on your tutorial -- and, thanks for the great project.
ReplyDeleteGreat treat container! What could be better than chocolate and a wonderful altered jar to save??
ReplyDelete