If you are looking for our current Sketch Challenge (MMSC25) click HERE.
Below is this weeks fabulous Tutorial from our very own Guest Design Diva Linda.
 Chalking is such an unrated technique, one that I just love for a number of reasons...the first being that it is so easy and they are so 'kind' to work with - while you are using them dry you can rub out any mistakes (phew!) I have been asked so many times to show how I do chalking, that when Priscilla from Midnight Madness Sketch Challenge asked me to consider doing my first Tutorial as the October Guest Diva, I knew it would have to be on chalking! Please bear in mind this is my VERY FIRST Tutorial....
These are the basics to get your chalking happening:
~White card stock for stamping your image. I have found that some card is better than others for chalking, if they have a 'coating' of any sort, then the chalks don't adhere too well and it is TWICE as much work!
~ Blender Pens, I use the Stampin' Up ones and really love them! Don't throw away your older ones, they are still great to use and I will show you why as we go along.
~ Cotton buds, or as many of you say 'Q-tips' These are the best thing. many people use eye shadow applicators, but I have found that cotton buds are perfect - I love them for this!
~ A Water Colour Pen or Pen, for adding fine detail. I also use White Gel Pen a lot for highlights as well as Glitter pens.
~ Dimensional Magic - this is the same thing as Crystal effects. This is to add gloss to any features - depending on the card

If you are cutting out your image, which I often do, don't do it until after you have finished, it is easier to work that way! Okay...we are ready to start. I start with a Cotton Bud and colour all the flesh areas. I basically use the same technique as Water Colouring, you start with the lightest colour and applying about 3 applications, each one going a shade darker IF YOU CHOOSE! remember you are not for definition with this layer - we are just setting a base to build on as you can see here!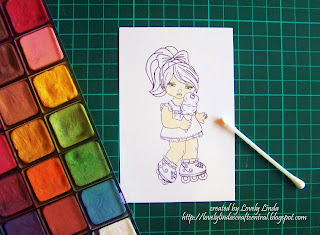
I like to have shading with the clothing and start from the outside in, leaving a strip of white in the middle, again you build these layers as you go and can make the gap smaller of you need to, blending as we go....remember nothing is permanent at this stage!! Something like this is what we are aiming for:
I do each layer of colour fully before going onto the next...you should be building depth as you go. At this stage you can rub out anything you aren't happy with, have perhaps gone over the edge or want to add some shading!!
Note - I do NOT add the colouring on the cheeks until last!
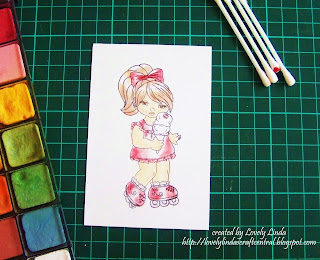
You can see now the image is starting to 'take shape' and you are getting the definition - this is where it gets exciting...the BLENDER PEN!! I use this to add the final definition, really defining light and shade and adding those extra touches that you would like to have stand out. This is totally a personal thing, the same as water colouring - this is where it reflects your style. I have looked at many styles with colouring and taken what I like from each, put it together and come up with my own 'flavour.'
Once I have done this I use a pen, in this case a red one, to do any finer lines and detail eg. the swirls and detail on the shoes, the cherry on the ice cream, anything you think needs it!
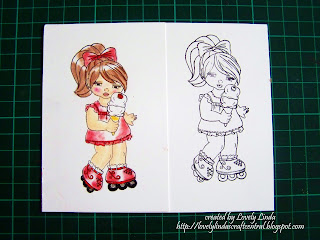
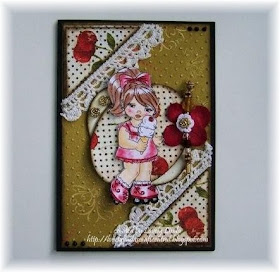
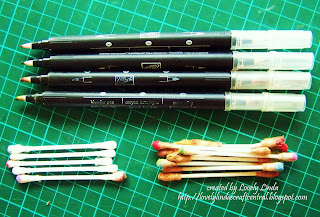
A TIP FOR YOU!! I have used new cotton buds and the newer Blender Pens for this Tutorial, but don't throw out your cotton buds and Blender Pens to soon - I love using the 'seasoned ones' and have included this photo to show you what I mean - you may want to 'brace yourself' they are not pretty but they work beautifully!!
Thank you for taking the time to have a look at this Tutorial. I hope it has been of some help to you - don't be afarid to give it a try - it is easier than you think! Please pop back and show us what you have done - I would love to see some chalking on your Midnight Madness Sketch Challenge!! God bless you!
Linda, you ROCKED your very first tutorial!! I know a lot of people have been waiting for it. Yeah we got to see you in action with your chalking technique. Thank you for sharing it with us!! :)

Thank you so much for teaching us this trick using Qtips, Linda! I usually only do 1 layer but now I will try more layers :) Thanks for sharing it with us! xox~Jeni
ReplyDeleteI've never used a water colour pen or blender pen with my chalks... love how vivid the colours on her are. Thanks so much for the chalks tutorial, there's not a lot out there!!
ReplyDeleteThis is a great technique, Linda! Thank you for sharing the talented secrets of your amazing creations! Great job on your first tutorial, too!
ReplyDeletehugs!
I have never colored with chalks but I will try it ow. Already got an idea for a card. Thanks for this tutorial!
ReplyDeleteOMG!!!
ReplyDeleteI have to admit that I would never have thought about using chalks to color stamped images :O
I will have to try this out.
Thank you for sharing.
Hugs, Hulda M.
Hi Linda, very sweet image and so pretty the way you chalk painted it! Beautiful Card! Rosy E.
ReplyDeleteWhat a great tutorial Linda!!! I have used chalks with "cotton buds" before but not the blending pen. I am going to give this a go and see what I come up with. Fantastic!!!
ReplyDeleteHugs,
Carol
Tudo lindinho d+ por aqui!..♥♡♥*´¨
ReplyDeleteAdoro seu bloguinho..♥♡♥*´¨
.♥♡♥*´¨
.♥♡♥*´¨ Olá...
.♥♡♥*´¨
◀▶◀▶◀▶◀▶◀▶◀◀▶◀▶◀▶◀◀▶◀▶◀▶◀▶◀▶◀▶◀▶
♥Aprendi com o tempo que....♥♡♥*´¨
“Às vezes,.♥♡♥*´¨
é preciso esquecer um pouco a pressa
e prestar mais atenção em todas as direções
ao longo do caminho....♥♡♥*´¨
A pressa cega os olhos.
E deixamos de observar.♥♡♥*´¨
tantas coisas boas e belas
que acontecem ao nosso redor.
.♥♡♥*´¨
Às vezes,
o que precisamos está tão próximo...
Passamos,
olhamos,.♥♡♥*´¨
mas não enxergamos!.♥♡♥*´¨
Não basta apenas olhar..♥♡♥*´¨
É preciso saber olhar com os olhos,
enxergar com a alma e .♥♡♥*´¨
apreciar com o coração...".♥♡♥*´¨
εїз ღROSA\\(^_^)// PORTUGAL εїз
.♥♡♥*´¨ εїз εїз
ω ω ω ω ω ω ω ω ω ω ω ω
,,,~\\\\\\//////~,,,,,~\\\\\\l/////~,,,,,,
◀▶◀▶◀▶◀▶◀▶◀▶◀▶◀▶ ◀▶◀▶◀▶◀▶◀▶◀◀▶
.♥♡♥*´¨
.♥♡♥*´¨
.♥♡♥*´¨ Bjuuus no seu ♥ !!!
crocherosafimo.blogspot.com.♥♡♥*´¨
.♥♡♥*´¨.♥♡♥*´¨.♥♡♥*´¨.♥♡♥*´¨
I am just amazed at the depth of color you can get with chalks.. Your highlighting is amazing Linda.. I am so happy to see you doing these whimsical images because you really do them justice...LOVE this tutorial too.. Great details..Now to dig out my chalks..
ReplyDeleteLinda you are the queen of chalking and I'm so glad you did this tutorial for us all... I know there are going to be lots of people trying this now because you my dear get such great results with it!!! Thanks for taking the time to share it with us! God has blessed you with such talent... thanks for sharing it!!
ReplyDeleteOh Linda~~ thanks I really really want to try chalking!! You explained it beautifully!!
ReplyDeleteBlessings
Mary Lou
Thanks Linda for this detailed tutorial. I have these chalks but didn't know I could use a blender pen with them. I definitely will try this. Now only if my finished image will look as great as yours.....
ReplyDeleteAwesome, I will have to put a blender pen on my craft wish list. Thank you for the great toot!
ReplyDeleteWOWZER!! Linda, I really didn't know that chalk could look so awesome!! I've never seen it used so beautifully as in your creation here!! Fabby tut and I'm going to come back and see if I can't figure this out!! Thanks so much for sharing this!! HUGS
ReplyDeleteLinda you rock with the chalks!! Fantastic tips and beautiful results! Thanks for sharing them with us!!
ReplyDeletesmiles,Deena
Awesome tutorial. I have never tried chalking, though I have plenty of them. Just afraid of them I guess, now I think I will drag them out and give it a go. Of course you have one thing I don't have -- ARTISTIC TALENT!!
ReplyDeletePhyllis MMDesign Team
Thank you Linda. I have used chalks before and like them, I don't think that they get enough attention. I have not used the blender pen with mine but I loved your results so I will give it a go and I also love using a colored pencil for more visual appeal and spot work. Thank you again for sharing that and you did a great tutorial. Jane
ReplyDeleteBrilliant tutorial,thanks so much for sharing all your tips,really enjoyed this.x
ReplyDeleteThis is a fabulous image. A friend of mine has just bought some rolla boots and is planning to start skating to keep fit. This just reminded me of her. Fantastic x
ReplyDeletePS where did you get that image?
This is such a great technique. I've never seen it before. Well, I guess I probably saw it but didn't know it was chalking. Beautiful!!!
ReplyDeleteBlessings,
Christine
Very nice tutorial!Thanks so much for sharing!
ReplyDeleteThanks for sharing all those wonderful tips with us Linda! Who knew you could do all that blending with chalks? Your image looks sensational! Great tutorial!
ReplyDeleteGreat tutorial Linda. I'm still working on my techniques. This was REALLY HELPFUL!!! So glad you're a permanent designer on the team now!!!
ReplyDeleteit is a very wonderfull technic,thank you
ReplyDeleteHi Linda, Thankyou very much for creating this tutorial, had the pastels still wrapped as I didn't know how to use them, now unwrapped and used for the first time! Much Appreciated. Take CareX:)
ReplyDeleteLinda, what a great tutorial! Thanks for all the useful tips!
ReplyDeleteHi great tutorial must go and give it a try, I like using watercolour pencils, but this looks just as good. Christine x
ReplyDelete